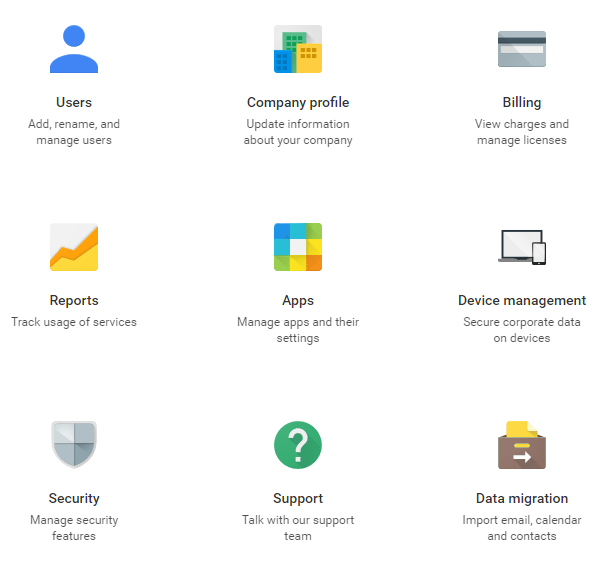
There are three kinds of headers I usually see used out on the ol’ interwebs — navigation headers, full photo headers and welcome mat headers. If you’re interested in how to make a blog header, you’ll have to know the pros and cons for each type before we get down to the nitty gritty of creation.
Navigation headers
Navigation headers are non-photo based. For example, at the very top of my website, I have my logo, plus links to important pages or signup forms. Take a look.

Navigation headers like these are ideal if you’re a fan of minimalism and want to get people to really focus on your writing without being distracted by images.
It’s also a great route to go if you’re new, haven’t figured out your branding, or just need to get up and running online.
The layout isn’t set in stone — navigation headers can be laid out all kinds of ways. You’ve probably seen some where the logo is in the center above text links, or it might just have the logo with no links (or vice versa).
This header often lives in harmony with additional blog headers (my site actually has another header beneath it, too), like full photo headers, and welcome mats.
Photo headers
The photo header style is very eye-catching and really draws you in. If you want a photo header on your blog, think about what the subject will be. Will it be a photo of a person? Like you, or you and your family, or some representation of your ideal customer? Or will it be a photo featuring some sort of landscape, pattern, cartoon/icons or even a video?
Your photo header can be combined with other header styles by pulling in navigational links or a welcome mat-style signup form.
Check out this example from AlexTooby.com. Alex uses a photo of herself plus a bit of the welcome mat idea with a strong call-to-action to sign up for her course.
 The photo works, both for newcomers and returning visitors. Why? Because she uses a couple subtle visual elements (more on these later) that serve to reinforce the strength of this header. She is holding her phone out, with the Instagram interface mocked up on it, and she’s looking toward the text she wants you to read. Your eye is naturally drawn to her face, then over to the words, then down to the bright pink button for clicking. This would be less effective if she was looking off to the left side of the screen.
Pro-Tip: Having someone facing “in” toward the copy or button is a ninja design trick you can use, too.
Photo headers can set a mood and help drive your readers to take action. Since photo headers are big, they block out other distractions on the page and help focus readers on exactly what you want them to do (like Alex’s “Start Free Course” button).
Welcome mat headers
The typical “welcome mat” you might see around the internet is a full-screen takeover, and there are tools that help you do this.

Or, if you don’t want to take over your entire page, you can also set up a portion to act like a welcome mat or a signup form for some special freebie you’re offering. Not sure what that would look like? Check out the image below from my website. I’m offering a free e-course that I want all visitors to see first so I can build my email list with the right audience for future emails and promotions. My blog entries appear below this so visitors can just scroll down to see my latest posts.

Now that you’ve seen the three different styles, it’s time to talk about creating a blog header for your website.
How to make a blog header that looks branded
I know the term “branded” sounds official and intimidating, but never fear! It’s actually pretty easy if you just focus on a couple key things. Namely, colors (often found in your logo) and fonts.
Pro tip: Put together a brand guide for yourself in a folder so you can keep track of this information (along with your logo) for easy access at any time.
Even if you don’t make some fancy printed guide, you can jot down this info on a sticky note and keep it on your monitor. It will save you loads of time in the long run! Now, let’s break down some design elements.
Choose your colors
You might have a few colors you’ve chosen to use for your brand, but a good place to start is with your logo. Your logo color(s) are a great to use across your website, branding and blog header. Consistency is key — if you feature a hot pink, then maybe your photos have one element of pink to them or an overall pink cast, or maybe you use black and white and pull in color in other ways.
Aby of YouBabyMeMummy.com does this beautifully by inserting a gorgeous, full-color version over her logo as an overlay on a black-and-white photo of herself with her daughter. This photo header really pulls you into her story in a bold and engaging way. Click around her site if you want to see more examples of stunning, full-screen images.

And if you’re still trying to figure out what colors to use in your brand, this article about color psychology is very revealing!
Select a font
Incorporating a stylish or branded font right into your header can be a really relevant and fast way to get your message across. Like in this very unique and eye-catching image from Luci over on ByLucinda.co.uk.
This seascape fits right in with her brand, which incorporates lots of natural elements, and showcases her elegant, yet sassy vibe. No Times New Roman for this lady! She also has a clever way of showing her social media links on the right side in a light green rectangular strip. It connects the top navigation with the big bold photo and helps to pull your eye down the page in an intentional way.

You can find some really fun, free fonts online from places like Font Squirrel and Dafont. Many of these free fonts are built right into programs like Canva and PicMonkey. However, since they are free, there’s a higher chance that someone else (a competitor even) could be using the one you want.
If you’re willing to purchase a font, then it’s easier to look unique.
If you want to use fancier fonts in the body or headlines of your website (i.e., not in an image), then you should take some time to learn about Google Fonts. And for guidance on which fonts to use for web design, check out these three commandments.
Incorporate visual elements
As you’re composing your branded blog header, you should think about what visual elements you want to include. We’ve reviewed examples using a logo, a photo and a big clear button.
You can take it a step further and incorporate a form as your call-to-action.
Jen from ToastMeetsJam.com does just that. She didn’t just drop in a table like you’d have in a boring spreadsheet — she used artistic bordering and great fonts along with her form fields and a circular “GO” button.

See how she seamlessly incorporates her email signup into the design? Not only is she engaging you with the photo of herself looking animated and friendly, but she’s also leveraging a clean, gray background to keep you focused on the text and the form. No distracting patterns or imagery to lure you away from the key task of filling out that form and moving forward. It couldn’t be more clear what you need to do to get her free, five-day course.
Get ready to design
You’ve seen some examples of great blog headers, but what do you do next? To get going on your own blog header, you’ll need to gather some design tools and image size information.
Design tools
The essential design tools for making your own custom blog header don’t have to be hard to use or expensive. Try a few out and see what you’re comfortable with, then go for it! Don’t worry if they feel awkward at first — you’ll get better the more you use them. Here are a few you can start exploring, in order from easiest to most difficult.
Canva. This is probably the easiest one on the market, and it’s free! There is a paid version called Canva for Work if you want to dive deeper, but the free version is really fun and easy to learn. It’s a web-based design tool, so you just log in to the website and use it right in your browser.
PicMonkey. If you’re really into editing photos and playing with filters, then PicMonkey is worth trying. There are many fun effects built in. Like Canva, PicMonkey is web-based and has a free version plus a paid one with additional functionality.
Photoshop. You can’t mention design software and not bring up Photoshop! It’s a powerhouse of a program and can do way more than just make a blog header, but it’s definitely great for that. It’s an application you download, and you’ll pay by monthly subscription (a free trial is also available).
As a professional designer, I’ve been using Photoshop for my entire career and I love it. Most of my readers think Photoshop is intimidating at first, but it’s completely doable once you learn a few basics. I have to say, though, since discovering Canva, I often use a combination of Photoshop and Canva to make my graphics. Canva is just so fun!
Pro tip: if you pick up the photography plan from Adobe, you can get Photoshop + Lightroom for a pretty low monthly cost. Not too shabby.
WordSwag. If you like making graphics on your phone, this is for you. This mobile application isn’t free, but is only a few dollars and has an iOS and Android version. Plus, it’s hooked up to a free creative commons stock photo site, so you are never at a loss for image choices in your blog header. It has all sorts of colors, textures and fonts to choose from. All you need to do is save your final graphic to “the cloud” or hook it up to your computer so you can upload it to your site.
Image sizes
When you’re creating your blog header, you need to consider the image size in relation to your site platform. The size for your WordPress theme might be different from the next person’s Squarespace page or GoDaddy GoCentral Website Builder. Here are some things to keep in mind:
Pixel dimensions. Sizes are usually listed as some number wide by some number tall and in pixel dimensions. For example: 1000×400 (or 1000px x 400px) means your image is 1000 pixels wide by 400 pixels tall.
Resolution. For the internet, your resolution is easy — it’s always 72! Higher resolutions like 300, 600 or more, are for printing. Screen resolutions for monitors are always just 72. So using our example dimensions from above, your final image would be 1000px wide by 400px tall, 72 dpi (or ppi).
File type. PNG files never lose quality no matter how many times you save them, but are larger in MB (megabyte) size. JPG (jpeg) files can be saved to different levels of quality so you can keep file size (MB) small, but each time you save them, they lose a little bit of quality. A .jpg file that is saved two times looks good, but after you save it five or 10 times, it will start to look pixelated and grainy.
Regardless of file type, it’s a good idea to optimize your files.
Optimizing means saving them to be more compact at a smaller file size, but carefully so you don’t lose quality. You can do this easily by using a free website called TinyPNG. Watch the cute panda compress your images in a way that keeps them looking fabulous but saves you megabytes!
How to make a blog header in Canva
Sign up for an account.
Use custom dimensions.
Select a free photo.
Add custom text.
Personalize your design.
Add a logo.
Download your blog header.
Now for the fun part! Let’s dig into making a custom blog header from scratch using Canva. I’m using resources that are available for free, so you can totally do this on your own right along with me. Just sign up for a free account and you’re ready to go.
Here’s the blog header we will be making:

1. Sign up for an account.
Once you sign up for an account at Canva, you’ll get to a Create a design page where you will want to click on Use custom dimensions in the upper right-hand corner.

2. Use custom dimensions.
Fill in your desired width and height in the fields that appear, and select “px” for pixels. After that, click the Design! button.

A fresh project appears with a blank screen and the Layouts tab selected on the left. Note that the project name wasn’t specified, so it names itself “1000px x 400px — Untitled Design” in the top next to the Share button.

3. Select a free photo.
Click on Elements, and choose a free photo from the ones provided. All the free ones say “FREE” in the bottom corner. You can also upload your own photo, but for our tutorial we will work with one of these free photos.

Once you click the photo, it instantly appears in the design area of your project. Let’s go ahead and rename this project while we’re at it. Click the temporary name up next to the share button, and type in a new one. I’m calling this “travel diaries” for my pretend travel blog.
After your image is sitting in the design area, you can make it larger by dragging the circles in the corners. Go ahead and resize this image to fit the document.

4. Add custom text.
Great! Now we need some text. Click on the Text tab in the left column, and you’ll see some options to choose from. You can click pre-designed text arrangements in the lower section of that window or on individual lines of text at the top. Go ahead and click on Add heading. This text appears in the image, defaulted to black.

Now for some fun! Let’s choose a different font. Browse through the font choices and pick anything that strikes your fancy. I chose a brush-styled one. It’s hard to see in black on top of that image, so let’s change it to white. Click the colorful box at the top to bring up color choices, and choose the white square. I also adjusted the size to 104.
Next, go ahead and drag that heading into place on the image so it’s more centered.

5. Personalize your design.
It’s a little hard to read and focus on the text on this busy background, so let’s add a blur effect. Just click on the background photo to select it, then choose Filter, and click on Advanced Options.

The filter window expands to show you some other things you can do. You can play with saturation, color tinting, add a vignette, and more.
Click on the black dot in the Blur section and drag it to the right. I chose +22 on the blurring scale.
6. Add a logo.
Now click out of that window to see your design. Looking good! Now let’s brand it by adding a logo. You can upload your logo by clicking the Uploads tab on the left, and then the big green Upload your own images button.
Choose a transparent .png version of your logo so it’s not flattened onto a solid color (unless your logo style is inside a white rectangle or something like that).
When it’s loaded, you’ll see it in the area below the green button. It stays there for you to use on future projects. Handy! I already had my fake logo uploaded, so I just scrolled down to find it.
Click on the logo, and then it will appear in your design.
Now you can resize it, move it around, and even get fancy and play with the transparency if you want.
7. Download your blog header.
Yay! Now your design is ready, so all that’s left is to download it. Click the Download button at the top of the screen, and choose your file type. I usually go with the recommended PNG type.

Once your design is downloaded to your computer, you can open it up and admire it, then load it to your blog.
And that’s all there is to it! Hopefully you’ve got a good grip on how to make a blog header and the importance of a stellar image. Now, you can go about adding one to your blog. Happy branding!