

If you are a small business that is just starting out, it is extremely important to build trust with your potential customers. Especially since you don’t have the credibility yet that comes from multiple years in business. One of the keys to building trust is having an email address that matches your business name. In fact, according to recent survey by GoDaddy, 75% of consumers say having a professional email address is key to trusting a small business online. With Gmail for business, also known as G Suite, you will be able to create a professional email account for $5 per month. This is a great option for businesses with multiple employees, because of the amount of storage offered, the admin capabilities, and the 24/7 customer support. G Suite is actually what we use here at Fit Small Business.
However, if you currently have a self hosted website and a small team (less than 5 people) it might make more sense for you to setup your email through your web host provider. This is free to do since a business email is included in most web hosting packages. We actually have a separate guide that will show you how to set this up, including how to link your email with the free version of Gmail. Yes, this means there is a way to create a business email address for free.
If you don’t already have a website but are interested in creating one, learn how you can create a WordPress website and get a free business email address in the process for just $2.95 a month with Bluehost.
If you have a larger team and therefore want more information on setting up Gmail for business, keep reading. In this article, we will cover:
- What is Gmail for Business?
- What are the Benefits of Using Gmail for Business?
- How to Setup Gmail for Business in 5 Steps
What is Gmail for Business?
Gmail for business, also known as G Suite, is the paid version of Gmail. Instead of having an email address that looks like yourname@gmail.com, your email address will include your domain name (yourname@yourdomain.com).
Having an email address that matches the name of your company and company’s website demonstrates to potential customers that you are a legitimate and trustworthy business.
Besides having your domain name in your email, the main difference is the admin panel where you will be able to administer all of your users, tracking reports, and data migration.
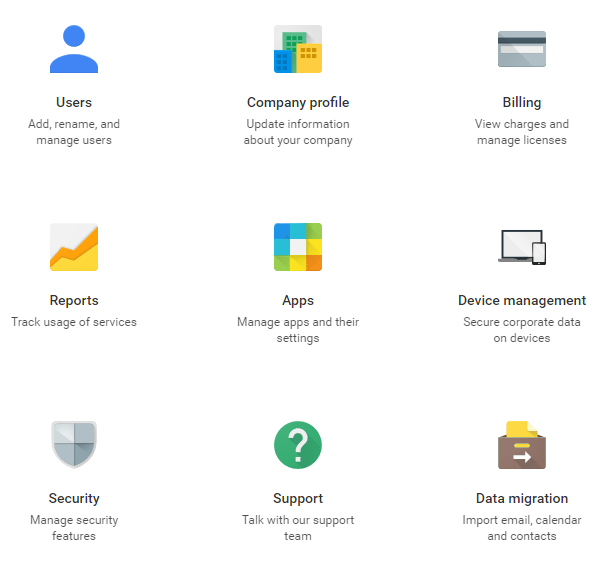
G Suite’s Admin Console
What are the Benefits of Using Gmail for Business?
Not only will Gmail for business allow you to have an email address with your domain name, there are also several features included that are helpful for businesses. Here are some benefits that you will be able to take advantage of:
- Email Account Ownership – You will own all of the email accounts, not your employees. Therefore, if someone leaves your company, you can turn off their access so that they will no longer be able to access contacts, emails, private information, etc.
- File Ownership – You will also control all of the files created within G Suite, such as Google docs, sheets and slides. You can view these even after an employee leaves the company.
- Document Sharing – It is easy to share files within the company. The document creator can allow different users access and choose what type of editing power they have.
- Group Email Addresses – You can create email addresses such as info@yourcompany.com at no additional cost. You’ll be able to choose which users have access to these groups.
- More File Storage – The paid version has 2x the amount of storage than the free version, with 30GB per user.
- Extra Security With 2-Step Verification – If you want to implement extra security measures, you can require your employees to implement 2-step verification. This will require them to have a code texted to their phone when logging in from an unknown device.
- Support – With Gmail for business you have access to 24/7 phone, email and chat support. With free Gmail you only have access to the self-help support documents.
All of these benefits are included in the $5 per month cost of G Suite. However, if the benefits mentioned above are not important to you, then you can save money by setting up a free business email address through your web host provider. View our in-depth guide to learn how to set this up.
How to Setup Gmail for Business in 5 Steps
Step 1: Register or Enter Your Domain Name
If you don’t already have a domain name, the first step to setting up a business email address is registering one. This will be the part of your email address that comes after the @ sign (ex: yourname@yourdomain.com).
You can check in the box below to see if the domain name you are interested in registering is available. You will be taken straight to the checkout page if the domain name is available. If it’s not, you will see a message that says, “the domain name is not available for registration.”
If you do already have a domain name and website, it’s a good idea to check with your web host to see if a free email address is included in your plan. If it is, you can follow this guide for setting up a business email address through your web host provider.
Another option is to register your domain name directly through Google as you’re signing up for Gmail for business. This will be an easier process (since you will be able to skip step #3), however it will be slightly more expensive ($12 per year). View our guide on the best place to register a domain name to learn more about where you can find less expensive domain name registrars.
Once you have your domain name, go to the G Suite website, hit the “Get Started” button on the top right, answer a few questions about your business, and then enter your domain name.
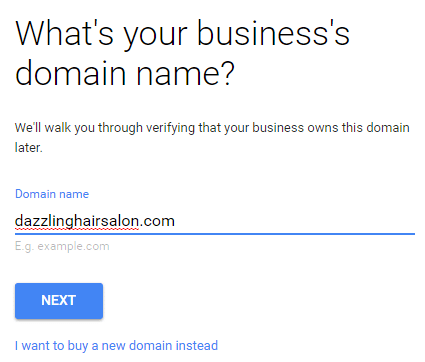
Enter your domain name
Step 2: Choose Your Email Address Format and Add Users
Next you will be taken to a page where you can add all of your employees that need a professional email address. You can set this up now, but you will also have a chance to add employees after you finish the process.
When choosing the email address format, you want to consider using a standard format for all users. View examples of different email address formats and when it’s appropriate to use each type to determine which format is right for your business.
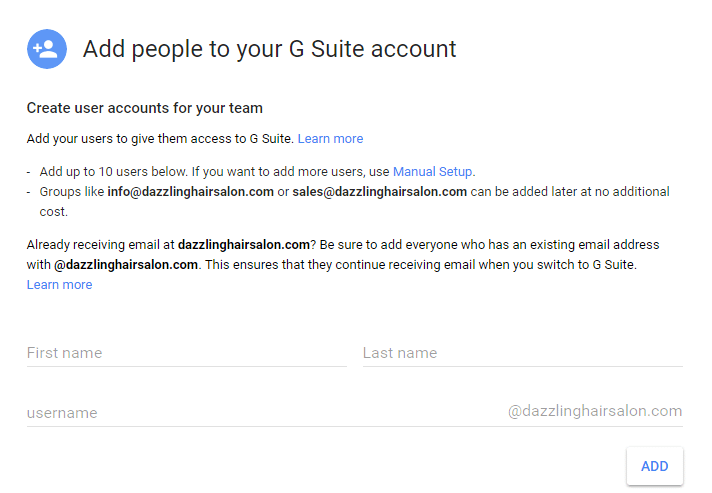
Add users to your account
Step 3: Verify Your Domain Name
If you did not register your domain name through Google, you will have to verify that you own the domain that you want to use in your email address.
In order to do this, you will need to enter the MX records that G Suite provides into your DNS.
We will provide instructions based on how to do this with Bluehost, but the process will be similar for all domain registrars.
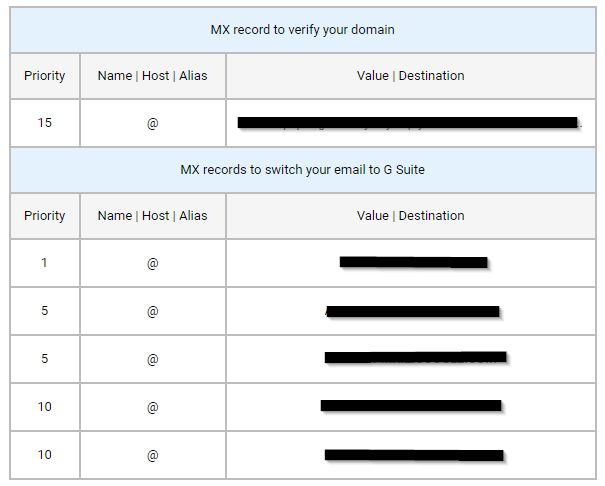
MX records from G Suite to add to your DNS
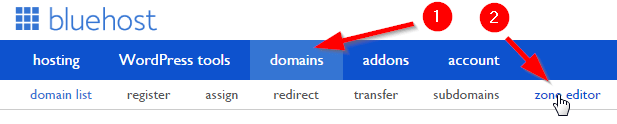
In Bluehost, you will click domains at the top, and then hit the zone editor.
You will then be able to add the MX records by selecting your domain, and entering the information provided by G Suite.
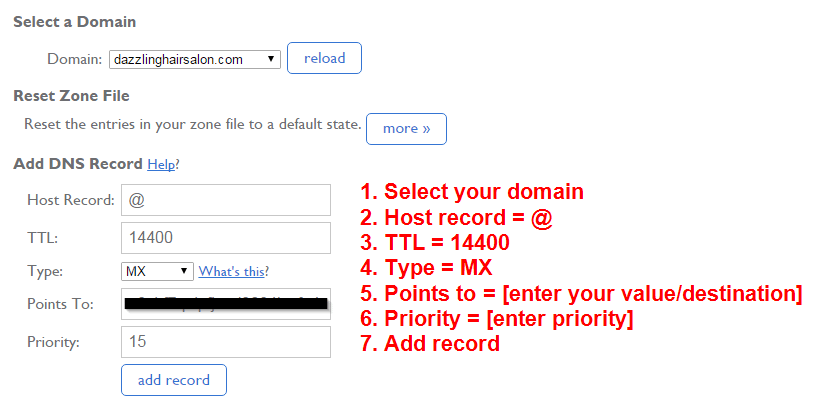
Enter the information from G Suite into the DNS editor
You will then need to delete any MX records that were already listed.
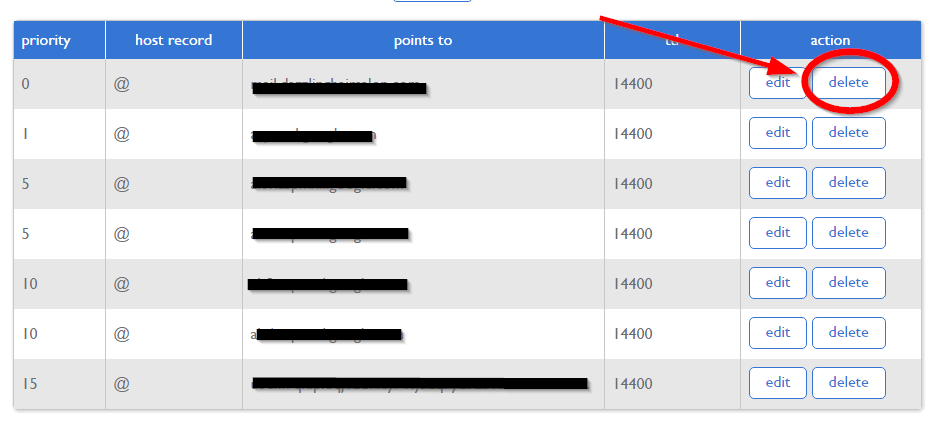
Delete any pre-existing MX records
After you hit save, you have successfully set up your G Suite account! It took about 2 hours for emails to start hitting my inbox, but G Suite says this can take up to 48 hours. You will receive an email when your inbox is ready to go.
Step 4: Choose Your Plan
You have already set up your account, but the free trial only lasts for 14 days. Therefore, if you want to maintain access to your account, you will need to choose and pay for your plan.
Notice that the cost is per user. A user is defined as a personalized email address. For example, jack@yourcompany.com and jill@yourcompany.com will be two separate users. You can setup a group email address, such as info@yourcompany.com for no additional cost.
| G Suite Basic | G Suite Business | |
|---|---|---|
| Monthly Price | $5 per user $4.17 per user (when paid annually) | $10 per user |
| Features | Business email, video conferencing, ability to administer user emails, and shared calendars | Business email, video conferencing, ability to administer user emails, shared calendars, track user activity, archive and set retention policies |
| Cloud Storage | 30 GB | Unlimited (or 1TB per user if fewer than 5 users) |
| Customer Support | 24/7 phone, chat and email | 24/7 phone, chat and email |
If you are fine with 15 GB of storage and don’t need to be able to administer user emails, then you may be better off setting up an email address for free using Bluehost. In this guide we show you how to do this, plus walk you through how to link the free business email address with the free version of Gmail. G Suite Basic is suitable for most businesses. The main difference between the two options is the amount of storage offered, so if you need more cloud space you may want to upgrade to the G Suite Business plan.
Step 5: Migrate Your Current Emails from Your Previous Webmail Host (Optional)
Once you have your account setup, you may want to migrate your existing emails and contacts into your new account. To do this, first head to you admin console and click on Apps.
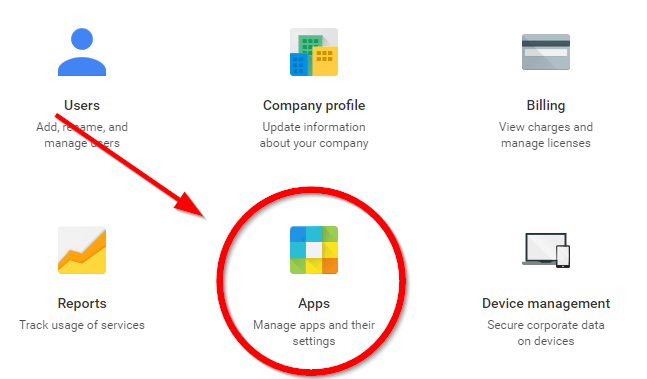
Click on G Suite > Gmail > Advanced settings. Then hit the box next to user email uploads. You will then be able to go to Gmail > Settings to start the import process.
Bottom Line
Having a business email address is an important step to making your business appear more professional. After you’ve completed this, it’s time to take it a step further by creating your business website. View our guide on setting up a WordPress website in under 30 minutes to get started.
If you are interested in a less expensive alternative to Gmail for business, view our guide on how to setup your business email address for free.


No comments:
Post a Comment